 AT&T Wireless
WAP/GPRS/Data/Email setup
AT&T Wireless
WAP/GPRS/Data/Email setupfor Sony Ericsson P800
AT&T Wireless
WAP/GPRS/Data/Email setupCopyright 2003 John Navas, All Rights Reserved.
Permission is granted to copy for private non-commercial use only.
Posted as <http://attwireless.navasgroup.com/p800_setup.htm>.
NOTE: This information is provided as a public service. The author has no connection to AT&T Wireless or Sony Ericsson except as a customer. The author is not responsible for any errors or omissions, or for any consequential problems that might result. USE AT YOUR OWN RISK.
This is a complete setup procedure for WAP (Wireless Internet/Wireless Internet Express), GPRS, CSD, and/or email. You will be skipping over the parts that do not apply to your service; e.g., if you don't have GPRS service, then setting up GPRS is pointless, since it won't work.
All screens not shown here should be left at default values unless you know what you are doing.
Email comments and suggestions to John Navas.
1. Select Applications
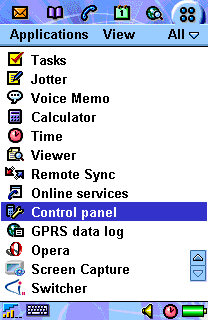
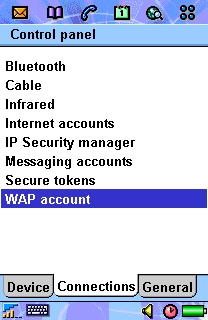
2. Select Control Panel
3. Select Connections tab
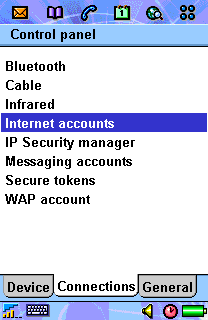
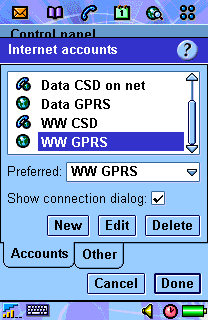
4. Select Internet Accounts
If you do not have Wireless Internet Express (WAP over GPRS), skip to Wireless Internet.
5. Create a New account
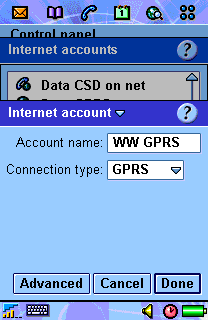
Account name can be whatever you want
(Example of "WW GPRS" stands for Wireless Window over GPRS)
6. Select Advanced
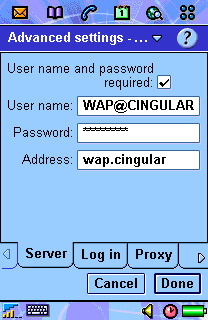
User name: WAP@CINGULARGPRS.COM
Password: CINGULAR1
7. Select Done to complete the account
If you do not have Wireless Internet (WAP over CSD), skip to WAP Setup.
8. Create a New account

Account name can be whatever you want
(Example of "WW CSD" stands for Wireless Window over CSD)
User name: WAP@CINGULAR.COM
Password: CINGULAR1
Phone number: +14152441012
9. Select Advanced

Connection type: ISDN
10. Select Done to complete the account
If you do not have either Wireless Internet Express or Wireless Internet, skip to Data GPRS.
11. Set your Preferred Internet account
12. Select Done to return to Control Panel, and then select WAP account
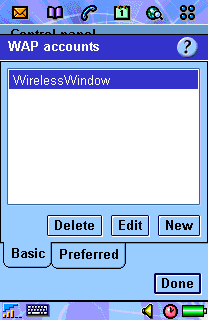
13. Create a New WAP account
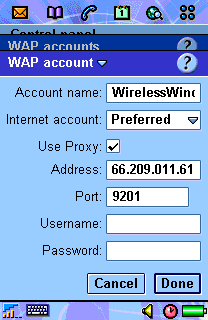
Account name: WirelessWindow (or whatever you want)
Check Use Proxy, enter Address and Port.
(Username and Password are blank.)
14. Select Done to complete WAP account
15. Select Preferred
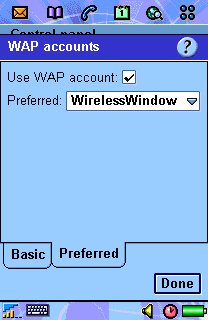
Check Use WAP account.
Select WAP account you created.
15. Select Done to complete the setup
If you do not have Data GPRS, skip to Data CSD.
16. Create a New account
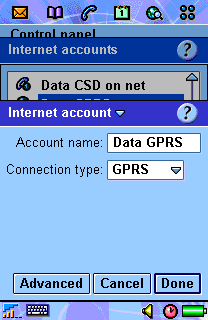
Account name can be whatever you want
(Example of "Data GPRS" stands for data over GPRS)
17. Select Advanced
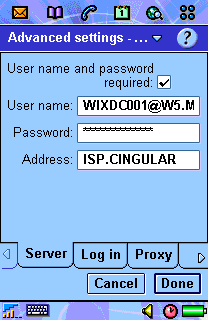
User name: WIXDC001@W5.MYCINGULAR.COM
Password: ZXY203DC9K0402
18. Select Done to complete the account
If you do not have Data CSD, skip to Email
Setup.
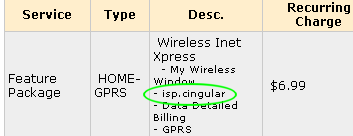
If you do not have the ISP.CINGULAR feature, skip to Data CSD (Dial-up ISP).
19. Create a New account for use when you are on the AT&T Wireless network (ISDN connection)
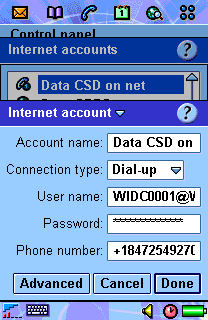
Account name can be whatever you want
(Example is "Data CSD on net")
User name: WIDC0001@W4.MYCINGULAR.COM
Password: ZXY203DC9K0402
Phone number: 18472549270
20. Select Advanced
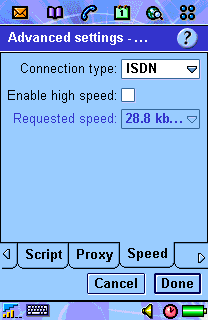
Connection type: ISDN
21. Select Done to complete the account
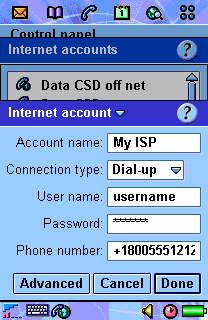
22. Create a New account for use when you are off the AT&T Wireless network (analog connection)
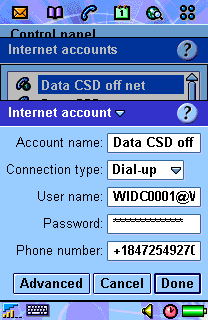
Account name can be whatever you want
(Example is " Data CSD off net")
User name: WIDC0001@W4.MYCINGULAR.COM
Password: ZXY203DC9K0402
Phone number: 18472549270
23. Select Advanced
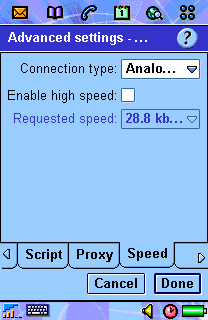
Connection type: Analog
24. Select Done to complete the account
If you do not have a standard dial-up ISP, skip to Email Setup.
25. Create a New account
Account name can be whatever you want
User name: [enter your userid at your ISP]
Password: [enter your password at your ISP]
Phone number: [enter a dial-up number for your ISP]
Use a "local" number to avoid long distance charges.
26. Select Done to complete the account
If you do not have either Data GPRS or Data CSD, skip this section. (WAP
will not work.)
If you do not have a standard email account that can be accessed over the
Internet, skip this section.
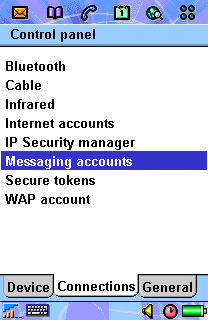
27. Select Messaging accounts in Control Panel
28. Create a New Email account
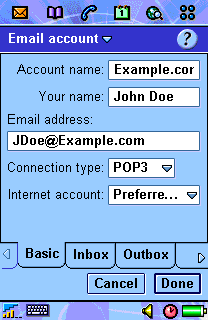
Account name can be whatever you want
Your name: [enter your name as you want it to appear in your email]
Email address: [enter your email address]
Connection type: [enter your connection type -- POP3 is most common]
29. Select Inbox

User name: [enter your userid at your ISP]
Password: [enter your password at your ISP]
Incoming server address: [get this from your ISP]
Download: [choose your download option]
30. Select Outbox
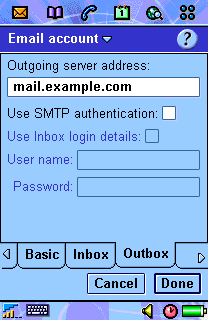
Outgoing server address: [get this from your ISP]
Authentication: [ask your ISP -- most ISPs require some type of SMTP
authentication!]
If SMTP won't work thru your ISP, try "photo.mycingular.com"
as the Outgoing server address.
31. Select Done to complete the Email account, and then select it in Preferred
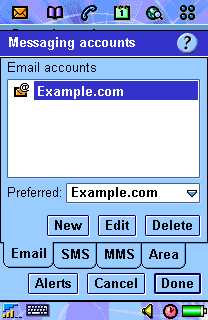
32. Select Done to complete Email setup (unless you have other accounts to create)
 Troubleshooting
GPRS Data (ISP.Cingular)
Troubleshooting
GPRS Data (ISP.Cingular)Screen captures by SCap-P800.
| Trademarks belong to their respective owners |